[워크삽] AWS 트레니엄 워크삽(8)-EKS 클러스터 구성
이 블로그에서는 AWS Trainium 인스턴스를 사용해 vLLM 배포에 최적화된 EKS 클러스터를 생성한다. vLLM 워크로드를 위한 프로덕션 준비형 패턴에 중점을 두고, 적절한 네트워킹과 리소스 할당으로 클러스터를 구성한다.
1. EC2 인스턴스에 연결
사전 요구 사항 섹션의 SSH 연결 지침에 따라 Remote-SSH Extension이 설치된 Visual Studio Code를 사용해 EC2 인스턴스에 연결한다.
SSH로 연결한 후 VS Code에서 Terminal을 열어 실습을 계속한다. workshop 폴더를 연다.
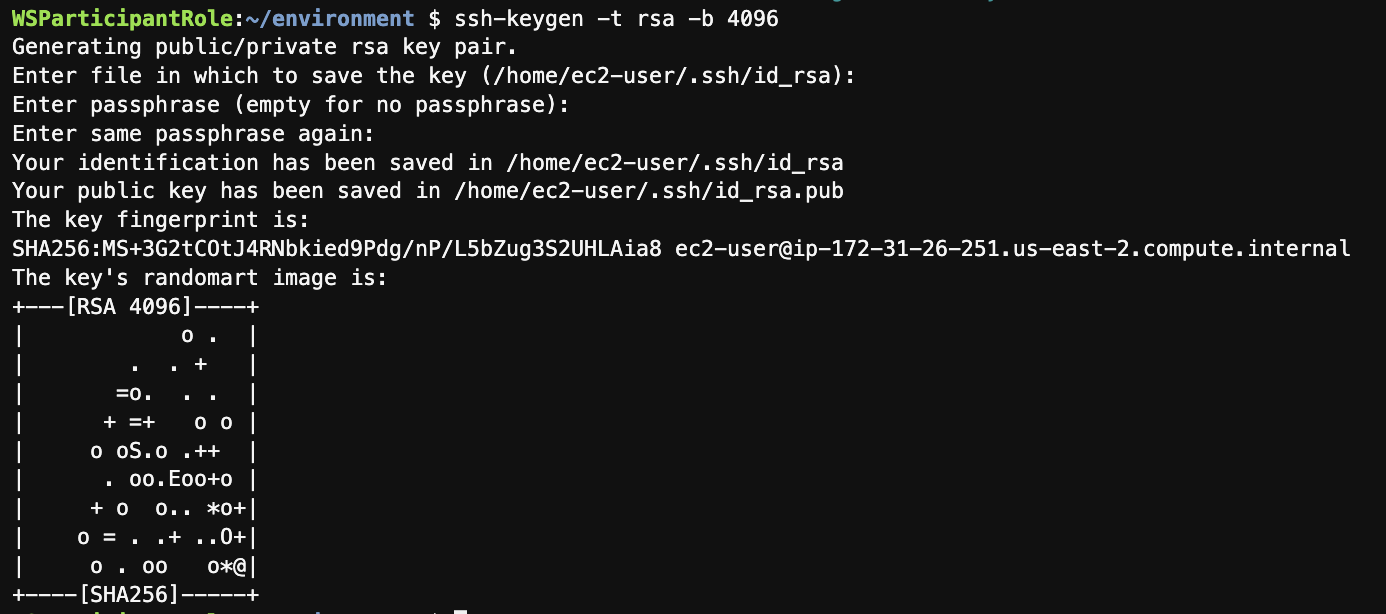 그림 1. VS Code에서
 workshop 폴더 열기
 그림 2. VS Code에서
 workshop Terminal 열기
2. 필수 도구 설치
필요한 모든 도구(AWS CLI, Helm, jq)를 설치하고 kubectl 자동 완성을 설정한다.
# Update package list and install tools
echo "Updating package list and installing tools..."
sudo apt update
sudo apt install -y python3-pip jq unzip

# Install AWS CLI v2
echo "Installing AWS CLI v2..."
curl "https://awscli.amazonaws.com/awscli-exe-linux-x86_64.zip" -o "awscliv2.zip"
unzip awscliv2.zip
sudo ./aws/install --update

# Install Helm
echo "Installing Helm..."
curl https://raw.githubusercontent.com/helm/helm/main/scripts/get-helm-3 | bash

# Enable kubectl autocompletion for current session and add to bashrc
echo "Setting up kubectl autocompletion..."
source <(kubectl completion bash) && echo "source <(kubectl completion bash)" >> ~/.bashrc

# Verify installations
echo "Verifying installations..."
aws --version
helm version --short
jq --version
echo "kubectl autocompletion enabled!"
3. SSH Terminal에서 EKS 클러스터 설정
VS Code Terminal에서 EKS 클러스터 구성을 설정한다. 아래의 Region 변수를 작업 중인 Region(us-west-2)으로 설정한다.
export AWS_REGION=us-west-2
export CLUSTER_NAME=ai-infra-summit-test-cluster
export EKS_VERSION=1.33
export INSTANCE_TYPE=trn1.2xlarge
export DESIRED_NODES=1
export WORKER_AMI=$(aws ssm get-parameter \
    --name /aws/service/eks/optimized-ami/1.33/amazon-linux-2023/x86_64/neuron/recommended/image_id \
    --region $AWS_REGION \
    --query "Parameter.Value" \
    --output text)
export BUCKET_NAME=ai-infra-summit-vllm-models-cache
export AWS_ACCOUNT_ID=$(aws sts get-caller-identity --query Account --output text)
export BUCKET_NAME=ai-infra-summit-vllm-models-cache-${AWS_ACCOUNT_ID}
export AWS_REGION=us-west-2
3-1. 클러스터 접근 구성
# Update kubectl config to connect to the cluster
aws eks update-kubeconfig --region $AWS_REGION --name $CLUSTER_NAME
3-2. Node 접근용 SSH Key 생성
EKS Worker Node에 안전하게 접근할 때 사용할 SSH Key Pair를 생성한다.
# Generate SSH key for node access
ssh-keygen -t rsa -b 4096 -f ~/.ssh/id_rsa -N ""

Figure 3. SSH Key 생성
4. 클러스터 네트워킹 구성
Node Group에서 사용할 수 있는 EKS 클러스터의 Public Subnet을 가져온다.
# Get VPC and create public subnets for trn1.2xlarge instances
VPC_ID=$(aws eks describe-cluster --name $CLUSTER_NAME --region $AWS_REGION --query 'cluster.resourcesVpcConfig.vpcId' --output text)
PUBLIC_ROUTE_TABLE=$(aws ec2 describe-route-tables --filters "Name=vpc-id,Values=$VPC_ID" "Name=route.destination-cidr-block,Values=0.0.0.0/0" --query 'RouteTables[0].RouteTableId' --output text)

# Get supported AZs for instance type
SUPPORTED_AZS=($(aws ec2 describe-instance-type-offerings --location-type availability-zone --filters "Name=instance-type,Values=$INSTANCE_TYPE" --query 'InstanceTypeOfferings[*].Location' --output text))

# Get public subnets in supported AZs
VALID_SUBNETS=()
for az in "${SUPPORTED_AZS[@]}"; do
  subnet=$(aws ec2 describe-subnets --filters "Name=vpc-id,Values=$VPC_ID" "Name=map-public-ip-on-launch,Values=true" "Name=availability-zone,Values=$az" --query 'Subnets[0].SubnetId' --output text)
  [ "$subnet" != "None" ] && [ "$subnet" != "" ] && VALID_SUBNETS+=("$subnet")
done

# Ensure we have at least 2 subnets
[ ${#VALID_SUBNETS[@]} -lt 2 ] && { echo "Error: Need at least 2 public subnets in AZs that support $INSTANCE_TYPE"; exit 1; }

# Get first two valid subnets and their AZs
PUBLIC_SUBNET_1=${VALID_SUBNETS[0]}
PUBLIC_SUBNET_2=${VALID_SUBNETS[1]}
AZ_1=$(aws ec2 describe-subnets --subnet-ids $PUBLIC_SUBNET_1 --query 'Subnets[0].AvailabilityZone' --output text)
AZ_2=$(aws ec2 describe-subnets --subnet-ids $PUBLIC_SUBNET_2 --query 'Subnets[0].AvailabilityZone' --output text)

echo "Using PUBLIC_SUBNET_1: $PUBLIC_SUBNET_1 in $AZ_1"
echo "Using PUBLIC_SUBNET_2: $PUBLIC_SUBNET_2 in $AZ_2"
4. Node Group 생성 및 배포
Node Group 구성 파일을 생성하고 클러스터에 배포한다.
cat > eks_nodegroup.yaml <<EOF
apiVersion: eksctl.io/v1alpha5
kind: ClusterConfig
metadata:
  name: $CLUSTER_NAME
  region: $AWS_REGION
  version: "$EKS_VERSION"
vpc:
  id: $VPC_ID
  subnets:
    public:
      $AZ_1: { id: $PUBLIC_SUBNET_1 }
      $AZ_2: { id: $PUBLIC_SUBNET_2 }
  securityGroup: $(aws eks describe-cluster --name $CLUSTER_NAME --region $AWS_REGION --query 'cluster.resourcesVpcConfig.clusterSecurityGroupId' --output text)
managedNodeGroups:
- name: neuron-trn1-2x
  ami: $WORKER_AMI
  amiFamily: AmazonLinux2023
  subnets: ["$PUBLIC_SUBNET_1", "$PUBLIC_SUBNET_2"]
  iam:
    attachPolicyARNs:
    - arn:aws:iam::aws:policy/AmazonEKSWorkerNodePolicy
    - arn:aws:iam::aws:policy/AmazonEC2ContainerRegistryReadOnly
    - arn:aws:iam::aws:policy/AmazonSSMManagedInstanceCore
    - arn:aws:iam::aws:policy/AmazonS3FullAccess
    - arn:aws:iam::aws:policy/AmazonEKS_CNI_Policy
  instanceType: $INSTANCE_TYPE
  desiredCapacity: $DESIRED_NODES
  volumeSize: 100
  volumeType: gp2
  ssh:
     allow: true
     publicKeyPath: ~/.ssh/id_rsa.pub
EOF
5. Node Group 배포 및 Node 구성
Node Group을 클러스터에 배포하고 적절한 Label로 Node를 구성한다.
# Create nodegroup and wait for completion (takes 3-4 minutes)
eksctl create nodegroup --config-file=eks_nodegroup.yaml

# Wait for nodes to be ready and label them
kubectl wait --for=condition=Ready nodes --all --timeout=300s
NODE_NAME=$(kubectl get nodes -o jsonpath='{.items[0].metadata.name}')
kubectl label node $NODE_NAME alpha.eksctl.io/nodegroup-name=neuron-trn1-2x

echo "Nodegroup creation completed successfully!"
5-1. 클러스터 생성 확인
클러스터 생성과 구성이 완료되면 설정 상태를 확인한다.
# Verify cluster status
kubectl get nodes -o wide

# Check node labels and taints
kubectl describe nodes -l alpha.eksctl.io/nodegroup-name=neuron-trn1-2x

# Verify Neuron device plugin (should be installed automatically)
kubectl get pods -n kube-system | grep neuron
5-2. Neuron Cache용 S3 Bucket 생성
aws s3 mb "s3://$BUCKET_NAME" --region "$AWS_REGION"
5-3. 기존 Neuron 구성 요소 정리
kubectl delete daemonset neuron-device-plugin -n kube-system
kubectl delete clusterrole neuron-device-plugin
kubectl delete serviceaccount neuron-device-plugin -n kube-system
kubectl delete clusterrolebinding neuron-device-plugin
5-4. Neuron Device Plugin 배포
Kubernetes가 Neuron 장치를 인식하고 할당할 수 있도록 Helm을 사용해 Neuron Device Plugin을 설치한다.
helm upgrade --install neuron-helm-chart oci://public.ecr.aws/neuron/neuron-helm-chart --set "npd.enabled=false"
5-5. Neuron Device Plugin 배포 확인
Neuron Device Plugin이 정상적으로 실행되는지 확인한다.
# Verify the device plugin daemonset is running
kubectl get ds neuron-device-plugin -n kube-system

# Verify that nodes have allocatable neuron cores and devices
kubectl get nodes "-o=custom-columns=NAME:.metadata.name,NeuronCore:.status.allocatable.aws\.amazon\.com/neuroncore"
5-6. Neuron Scheduler Extension 배포
Neuron 워크로드의 스케줄링을 최적화하기 위해 neuron-scheduler-extension을 설치한다.
helm upgrade --install neuron-helm-chart oci://public.ecr.aws/neuron/neuron-helm-chart \
    --set "scheduler.enabled=true" \
    --set "npd.enabled=false"
5-7. Neuron Scheduler Extension 배포 확인
Scheduler Pod가 정상적으로 실행되는지 확인한다.
# Check that my-scheduler pod and k8s-neuron-scheduler pod are in running status
kubectl get pods -A

Figure 4. Neuron Scheduler Pod 실행 상태
5-8. Amazon S3 CSI Driver 설치
Kubernetes에서 S3 Bucket을 Storage Volume으로 사용할 수 있도록 Mountpoint for Amazon S3 CSI Driver를 설치한다.
# Add the Helm repository for AWS Mountpoint S3 CSI Driver
helm repo add aws-mountpoint-s3-csi-driver https://awslabs.github.io/mountpoint-s3-csi-driver
helm repo update

# Install the CSI driver using Helm
helm upgrade --install aws-mountpoint-s3-csi-driver \
    --namespace kube-system \
    aws-mountpoint-s3-csi-driver/aws-mountpoint-s3-csi-driver
5-9. S3 CSI Driver 배포 확인
S3 CSI Driver Pod가 정상적으로 실행되는지 확인한다.
# Verify the S3 CSI driver pods are running
kubectl get pods -n kube-system -l app.kubernetes.io/name=aws-mountpoint-s3-csi-driver
 그림 5. S3 CSI Driver Pod 실행 상태
5-10. 클러스터 준비 상태 확인
클러스터가 vLLM 배포 준비를 마쳤는지 최종 확인한다.
echo "=== Cluster Status ==="
kubectl get nodes

echo -e "\n=== Neuron Devices ==="
kubectl describe nodes -l alpha.eksctl.io/nodegroup-name=neuron-trn1-2x | grep "aws.amazon.com/neuron"

echo -e "\n=== Storage Classes ==="
kubectl get storageclass

echo -e "\n=== Current Namespace ==="
kubectl config get-contexts
6. 클러스터 아키텍처 개요
현재 EKS 클러스터는 다음 요소로 구성된다.
- 기본 EKS 클러스터(Kubernetes 1.33): VPC CNI와 OIDC가 활성화된 핵심 클러스터다.
- Neuron Managed Node Group(trn1.2xlarge): vLLM 추론 워크로드를 위한 500GB Storage를 갖춘 단일 고성능 Node다.
- Neuron Device Plugin: Trainium 장치를 Kubernetes에 노출한다.
- S3 Model Cache: 컴파일된 모델 Artifact를 저장하는 Bucket이다.
- 강화된 IAM 권한: 포괄적인 모델 관리를 위해 S3, ECR 및 SSM 접근 권한을 가진 Node Role이다.
이제 모델 캐싱이 활성화된 상태로 vLLM을 배포할 수 있도록 클러스터가 준비되었다.
7. 다음 단계
EKS 클러스터 구성이 완료되었으므로 배포 섹션으로 이동할 수 있다. 다음 섹션에서는 Init Container 기반 모델 준비와 S3 캐싱을 사용하는 vLLM Pod를 배포한다.
댓글남기기