OpenAI Agents 패턴(1)-간단한 에이전트 호출
OpenAI의 에이전트는 다른 프레임워크과는 확연히 다른 방식으로 접근한다. OpenAI의 오픈소스 SDK를 사용해 간단한 단일 에이전트 앱을 구성하는 방법을 살펴보겠다.
1. 간단한 에이전트 호출 구조
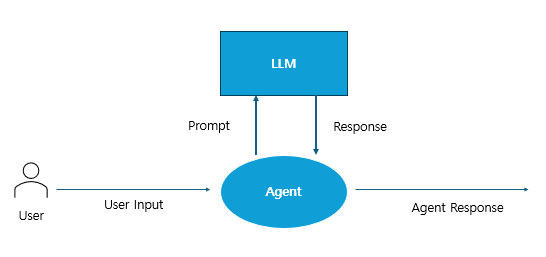
- 에이전트를 하나의 프로세스로 나타낸 데이터 흐름도(Data Flow Diagram)
- 사용자 프롬프트가 시작 신호로 작용하며, 에이전트는 하나 이상의 LLM 호출을 수행하고 응답을 받는다.
- 작업이 완료되면 에이전트 응답을 출력함.
2. 간단한 에이전트 호출 예제
-
OpenAI Agent SDK를 사용하여 구현한 기본 프로그램 코드 예제
-
에이전트를 생성하고 이름(name)과 지침(instruction)을 설정한 후, 이를 실행하여 결과를 출력
-
Streamlit 앱으로 UI 구현하는 방식
-
-
실행 중인 에이전트를 하나의 프로세스로 표현하고, 그 안팎으로 데이터가 흐르는 방식
import streamlit as st import asyncio from agents import Agent, Runner -
에이전트의 실행이 완료될 때까지 기다리는 비동기처리 하기 위해 Streamlit 과 asyncio 패키지는 필요
agent = Agent(name="Assistant", instructions="You are a helpful assistant") async def run_agent(input_string): result = await Runner.run(agent, input_string) return result.final_output -
Streamlit 함수들을 이용해 사용자 인터페이스(UI) 정의
st.title("Simple Agent SDK Query") user_input = st.text_input("Enter a query and press 'Send':") st.write("Response:") response_container = st.container(height=300, border=True) if st.button("Send"): response = asyncio.run(run_agent(user_input)) with response_container: st.markdown(response) -
사용자는 질문을 입력하고 ‘Send’ 버튼을 누를 때, run_agent 를 실행한다.
-
루프를 한 번만 돌고 끝남
from agents import set_default_openai_api set_default_openai_api("chat_completions") -
단순화를 위해 기본 Response API를 사용
댓글남기기